Showing posts with label Raspberry PI. Show all posts
Showing posts with label Raspberry PI. Show all posts
Weggie anyone?
My Pi Wedge arrived and I was surprised to see it was in pieces and some soldering was required before it would be any use. I am a complete first timer for electrical soldering but I had a soldering iron and some solder lying around.
So what did I learn? Not all soldering irons are created equal and the one had was less equal than most. The large tip and long handle made working clumsy and not being able to regulate the temperature made me slightly nervous of frying the circuit board. Which type of soldering wire to use? The youtube tutorial that I watched mentioned Rosin core for electrical applications and acid core for plumbing applications.
I could only find resin core and acid core so I went with the resin core and crossed my fingers that it was the right option. My solder work is a bit of an ugly duckling but I tested a few of the pins and to my relief they are working.
Following the Sparkfun Hookup guide will get you started and the Raspberry gPio tutorial will get you the rest of the way.
Now what am I going to build?
Rasberry Pi Model B+
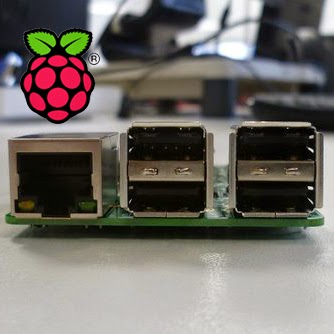
The model B+ is looks great and the first thing that is immediately obvious is the 4 USB ports that are on the board itself. This is a great new feature because it means that you can plug in your wifi dongle, mouse and keyboard without the need for a external usb hub. Power might be an issue although the new board does consume less power than the old model B. If you have already tested this board then feel free to drop me a comment below. MicroSD has replace the old SD card and the model B+ is surprisingly cheap because you don't require an external USB hub.
What on the board?
- More GPIO. The GPIO header has grown to 40 pins, while retaining the same pinout for the first 26 pins as the Model B.
- More USB. We now have 4 USB 2.0 ports, compared to 2 on the Model B, and better hotplug and overcurrent behaviour.
- Micro SD. The old friction-fit SD card socket has been replaced with a much nicer push-push micro SD version.
- Lower power consumption. By replacing linear regulators with switching ones we’ve reduced power consumption by between 0.5W and 1W.
- Better audio. The audio circuit incorporates a dedicated low-noise power supply.
- Neater form factor. We’ve aligned the USB connectors with the board edge, moved composite video onto the 3.5mm jack, and added four squarely-placed mounting holes.
Raspberry Pi Camera
I ordered my Raspberry Pi Camera just before lunch yesterday and it was waiting for me when I got into the office this morning. I ordered it from BushVeld Labs and was very impressed at how quickly it arrived.
Camera Specifications:
Camera Specifications:
- Fully compatible with both the Model A and Model B
- 5 megapixel Omnivision 5647 Camera Module
- Still picture resolution 2592x1944
- Video: supports 1080p @30fps, 720p @ 60fps, 640p @60/90fps
- 15-pin MIPI Camera Serial Interface - plugs directly into the raspberry pi board
- Size: 20x25x9mm
- Weight: 3g
It was easy to install and I can't wait to start using it in future projects.
Raspberry Pi goes wireless
I finally got around to configuring the wifi on my Raspberry Pi. It took some time but i think the key was getting a compatible self powered usb hub and plugging the wifi adapter directly into one of the ports. Once I did that the light on the adapter started flashing and I could connect to the network. Now that the Pi is wireless I am really excited about the things that I can start to build from the comfort of my chair.
Some hints that may help you get started:
Some hints that may help you get started:
- The ssid is case sensitive.
- This is a raspberry Pi so once you have found your wifi network be patient it can take a while to connect.
- Update /etc/network/interfaces.
- Update /etc/wpa_supplicant/wpa_supplicant.conf.
- If something is not working as expected then plug it into the usb hub and try again.
Raspberry PI
My Raspberry PI arrived by courier a couple of days ago and I am super excited to start playing around with it. I ordered it from Hobbytronics who I have used before and all of my orders arrived in perfect condidtion. I choose the RAM courier option at an extra R80, rather keep it out of the za postal system.
Now I read that it was small but seeing is believing, it really is tiny and surprisingly light weight! I have no idea what I am going to build first but I bought two magazines that will help get me up and running. I'll start by learning some basic Python and take it from there. I really like the way the guys at Codecademy run their FREE courses so they get a mention here but you can find loads of resources for learning Python online.
 The Raspberry PI is known as the $35 computer but once you have bought all of the other gear to get it up and running it will be quite a bit more expensive.
What you need:
SD card (This is where the OS goes so I went for a class 10)
USB Keyboard
USB Mouse
Monitor/TV
HDMI Cable
Powered USB Hub(optional)
Power Supply for the Rasberry PI (I bought a mico-USB to USB cable and plugged it into a spare iPhone charger at 1A)
Remember if I can build it you can too!
Now I read that it was small but seeing is believing, it really is tiny and surprisingly light weight! I have no idea what I am going to build first but I bought two magazines that will help get me up and running. I'll start by learning some basic Python and take it from there. I really like the way the guys at Codecademy run their FREE courses so they get a mention here but you can find loads of resources for learning Python online.

What you need:
SD card (This is where the OS goes so I went for a class 10)
USB Keyboard
USB Mouse
Monitor/TV
HDMI Cable
Powered USB Hub(optional)
Power Supply for the Rasberry PI (I bought a mico-USB to USB cable and plugged it into a spare iPhone charger at 1A)
Remember if I can build it you can too!
Subscribe to:
Posts
(
Atom
)


